
If you want to install cool apps on your iPhone or iPod Touch for free, easily, breaking Apple-imposed limitations without breaking your warranty or Applethingie, here is the how-to guide for Mac and Windows users.
What is a jailbreak?
Jailbreaking is the process required to install applications in your iPhone or iPod touch. It is a very easy procedure. It's also safe: There are no risks in this operation*, as you can easily use iTunes to restore your iPhone or iPod touch to the default factory settings. When you do that, the iPhone will be like new.
Why jailbreak your iPhone or iPod touch from Apple's iron fist?
You should jailbreak your iPhone or iPod if you want to install really cool and useful applications that are not in the iTunes App Store. Many of these apps are a complete must for any iPhone user but are not allowed by Apple in their iTunes App Store.
This is what you can do with a phone that has been jailbroken:
• Use your iPhone as a 3G modem with your laptop.
• Record video using Cycorder.
• Unlock your iPhone installing a simple program, so you can use a pre-paid card when you go out on vacation instead of paying outrageous roaming charges.
• Follow speech turn-by-turn directions in a GPS program.
• Copy and paste (yes, copy and paste).
• Play Nintendo Entertainment System games and other emulated classic cames (like
In other words: Do it.
*WARNING* Of course, the usual do this at your own risk and we are not responsible caveats still apply, but this process is really fool proof thanks to Apple's iTunes factory reset. If you are looking to unlock your iPhone now or in the future, DON'T USE THESE INSTRUCTIONS or you won't be able to unlock it. You will need a different process, which we will explain in another How To.
Opening the backdoor (Mac Users only)
The first thing you need to do to install free apps in your iPhone or iPod is putting it into DFU mode, or Device Firmware Update mode. Don't worry, this isn't anything weird: It's what your device goes through every time you update the operating system in it. With this step, you will be making the iPhone go into this state.
This is the only long part of this tutorial because—since the 10.5.6 update—Apple has made it difficult to easily connect your Mac to a manually DFU'ed iPhone or iPod. This can be solved by replacing some USB drivers from a previous version of Mac OS X. If you have 10.5.6 installed, follow these instructions:
Step 1. To do this, you need to get yourself a free Apple Developer Connection account. Since you are using iTunes with your device, you are already almost there: Just log in with your Apple ID from here. The form will ask you to answer a couple of questions (just answer whatever you want), and you'll be done as soon as you click the Accept button.
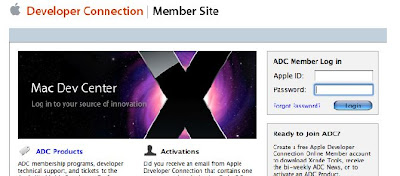
Step 2. Now you need to download and install the drivers. Go to this page and look for this file:
IOUSBFamily-315.4-log.dmg" for Mac OS X10.5.5 Build 9F33
Once it's downloaded, disconnect ALL USB peripherals except for your Apple keyboard and Apple mouse and install the package included in the disk image.
Once you restart after the installation, you will be ready to run QuickPwn, the program that will allow you to install the applications.
Important: Once you complete the jailbreaking process, you have to restore the previous USB drivers. Go to to this page and download IOUSBFamily-327.4.0-log.dmg" for Mac OS X 10.5.6 Build 9G55, then repeat the same operation. Once you restart, Mac OS X 10.5.6 will be restored to its original state.
Here's the easiest part: Running QuickPwn. QuickPwn is a program that will easily "jailbreak" your iPhone or iPod touch. Jailbreak, as the name says, just means breaking Apple's limitations on accessing your device, allowing you put anything you want in it. This means installing any application you want, and not only the ones that Apple allows you to install.
Step 1. Download QuickPwn for Mac OS X or Windows from any of the following links:
Windows
• QuickPwn 2.2.5 for Windows: Get the official release via Torrent here.
Unofficial mirrors
• http://miphone.ca/iphone-dev/QuickPwn225-2.zip
• http://foskarulla.com/QuickPwn-225-2.zip
• http://downloads2.touch-mania.com/QuickPwn-225-2.zip
• http://www.applei.ph/devteam/QuickPwn-225-2.zip
• http://phonenews.com/phones/gsm/apple/QuickPwn225-2.zip
• http://rabstalk.bplaced.net/mirrors/QuickPwn-225-2.zip
• http://www.evil-crew.de/QuickPwn-225-2.zip
• http://daniel14.com/QuickPwn-225-2.zip
Mac OS X
• QuickPwn 2.2.5: Get the official release via Torrent here.
Unofficial mirrors
• http://iphone-dev.fgv6.net/QuickPwn_2.2.5.dmg
• http://iphone.schwarzmetall.cn/QuickPwn_2.2.5.dmg
• http://rabstalk.bplaced.net/mirrors/QuickPwn_2.2.5.dmg
• http://jmcoon.net/QuickPwn_2.2.5.dmg
• http://www.iphone-storage.de/QuickPwn_2.2.5.dmg
• http://downloads2.ipod.backshot.eu/QuickPwn_2.2.5.dmg
• http://miphone.ca/iphone-dev/QuickPwn_2.2.5.dmg
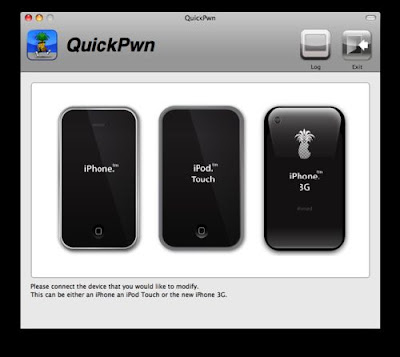
Step 2. Run QuickPwn and pick the kind of device you have: iPhone, iPhone 3G, or iPod Touch.
Step 3. Follow the instructions on the screen. QuickPwn is completely automated:
• Firstly, it will download all the necessary components from Apple on its own.
• Then the software will build a custom iPhone operating system, which includes Installer and Cydia, the two programs that will allow you to install the iPhone applications outside of the iTunes Apps Store microsystem.
• When QuickPwn asks you to enter your system password, do it. It's not malicious. It just needs this to work.
• Finally, follow the precisely timed instructions on the screen to put your device on DFU (Device Firmware Update) mode. QuickPwn will do the rest.
If something doesn't work, don't worry. Start the process again. If your device gets a bit nutty, restore it to default factory settings using iTunes, and you will be back to square one, no harm done.
Step 4. Be patient as your iPhone restarts. Once it's done, you are done too. It's fun time.
Installing the applications
This is where the fun starts. You will notice two new icons in your iPhone or iPod touch's springboard: One says "Installer" and the other says "Cydia". These are the two competing systems for installation of software. It doesn't really matter what you use to install your software. Most applications can be installed from both—there are exceptions, like xGPS, which can only be installed on Cydia—and both allow you to browse and install software from a a variety of sources.
• Browsing the catalogs. Whatever system you choose, installing applications is as easy as going through the available catalogs and picking the application you want.
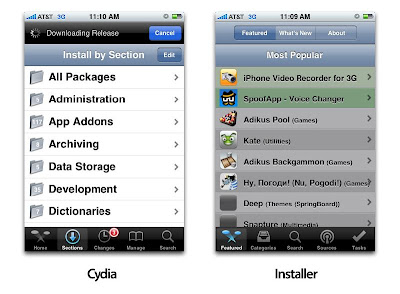
• Manually adding applications. There will be times in which you will discover applications on the web which are not in the default catalogs in Cydia or Installer. Fortunately, you can add these by just entering the URL provided by the developer in the web page, a process that is referred to as "Adding a source". Here's how to do it:
In Cydia
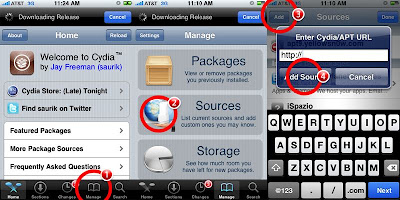
• Click on "Manage."
• Click on "Sources."
• Click on "Edit" and then "Add."
• Enter the address in the dialog field.
• Click on "Add source."
In Installer
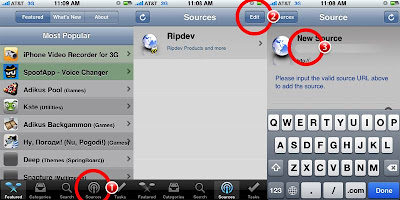
• Click on "Sources."
• Click on "Edit" and then "Add."
• Enter the address in the field.
• Click "Done" and get back to sources by clicking on "Sources."
And that's it. Now you can install any application you want using either program. Have fun!
No comments:
Post a Comment